You’ve got your headphones on, excited to dive into the latest episode of your favorite podcast, and suddenly, you’re bombarded with background noise that sounds like a family of crickets decided to join the party. With the magic of audio gating, we can show those noisy critters the exit.
In this post, we’re going to cover everything from the basic concept of noise gates to why they’re crucial for maintaining top-notch audio quality. Along the way, you’ll learn how to set up your own noise gate and discover the key parameters to adjust. By the end of this post, you’ll understand the ins and outs of this essential technique in audio production.
What is gating? Audio gating, also known as noise gating, is a technique used in sound recording and production to control an audio signal’s volume. This is particularly useful for eliminating unwanted noise or background sound in a recording.
What is gating?
Audio gating, or the use of a noise gate, is a technique used in sound recording and production. It works on the principle of allowing sounds at or above a certain threshold level to be heard, while muting sounds that fall below this threshold.

This helps to eliminate background noise or any unwanted sound in a recording. When the volume of the audio signal is above the threshold, the gate is ‘open’ and the audio passes through. When the volume falls below the threshold, the gate ‘closes’, silencing the audio. This is especially useful in live sound and studio recording settings.
Gating involves using a dynamic threshold as an on/off trigger, where signals below the threshold are suppressed (gate closed), and signals above the threshold are allowed to pass through (gate open). Audio gating can be used to reduce noise, drum bleed, and shape transients in a mix, making the audio sound more natural.
A noise gate is a type of audio gating that can be implemented using software or an electronic device to control the volume and intensity of an audio signal. It functions by setting the gain to zero for everything below a certain decibel level, preventing background sounds from getting through to the mix.
AKAI Professional MPK Mini MK3

AKAI Professional MPK Mini MK3
How does audio gating work?
Think of a noise gate as a virtual “bouncer” for your sound signal. It decides what gets through and what doesn’t base on the volume or ‘loudness’ of the audio. So here’s how it works, broken down into simple terms.
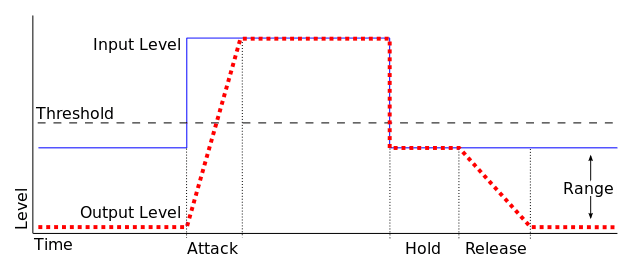
First, you’ve got to set a ‘threshold’. This is a volume level that a sound must exceed to be heard in your mix. Any sound that’s louder than the threshold will pass through the gate and be heard. The quieter sounds that don’t meet the threshold? They’ll be silenced.
The beauty of the gate is in its operation. When your drum hit, guitar riff, or vocal phrase comes in and the volume exceeds the threshold, the gate ‘opens’. That’s when your sound is allowed to pass through. But as soon as the volume drops back below the threshold, the gate ‘closes’ and silences the audio.
Now, you don’t want the gate to act too suddenly, right? So we have ‘attack’, ‘hold’, and ‘release’ parameters to fine-tune the process.

Why is audio gating important?
As a music producer, you’re always looking to capture the cleanest possible recordings. That’s where audio gating comes into play. When you’re capturing a specific sound, let’s say a singer’s voice, you want to make sure that the microphone mainly picks up the intended source and not all the other surrounding noises. We don’t want the stage sounds, floor monitors, or echoes to overpower the primary sound we want to capture.
With audio gating, we set a threshold, a volume level that acts as the gatekeeper. When the sound surpasses that threshold, the gate opens, allowing the signal to pass through. But when the sound falls below the threshold, the gate closes, effectively blocking out those lower-level stage noises or unwanted external sounds.
Why do producers and engineers use a gate?
Gates are valuable tools for producers and engineers, allowing them to manipulate audio signals in a way that improves the quality, clarity, and impact of their recordings and mixes. Here are some ways audio gating is used:
1. Noise reduction
Gates help reduce unwanted background noise by automatically muting or attenuating signals below a certain threshold. This ensures that only the intended audio is audible, improving the overall sound quality.
2. Drum bleed control
In multi-microphone recording setups, gates can be used to minimize the sound of other drums or instruments bleeding into the microphone intended for a specific drum or instrument. This helps to achieve cleaner and more isolated recordings of individual elements in a mix.
3. Transient shaping
Gates can be employed to shape the transient response of an audio signal, which can enhance the perceived impact or punch of percussive elements in a mix.
4. Improved clarity
By gating out low-level noise and unwanted signals, the overall clarity and focus of the mix can be enhanced, making it easier to work with during the mixing and mastering process.
What are the essential gating parameters?
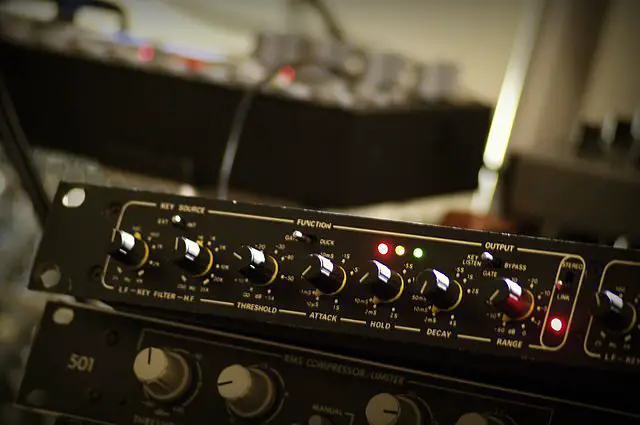
Now that we know where to find the gating controls, let’s dive into the essential parameters that shape the gating effect. These parameters determine how the gate opens and closes, affecting the sound in unique ways. Here are the key gating parameters:

- Threshold: The threshold is the key to the gate. It’s the decibel level at which the gate opens or closes. Setting the threshold determines the sensitivity of the gate to the incoming signal. A higher threshold requires a stronger signal to open the gate, while a lower threshold allows more sound to pass through.
- Attack & Release: The attack time controls the speed at which the gate opens, while the release (decay) time determines how quickly the gate closes. These parameters play a vital role in achieving a natural and smooth gating effect. Adjusting the attack and release times allows you to shape the sound’s dynamics and control the gate’s response to the input signal.
- Range: The range parameter controls the amount of decibel reduction applied when the gate is closed. It determines how much sound is allowed to pass through when the gate is closed. A larger range results in a more drastic reduction of sound, while a smaller range lets some sound pass through, albeit at a reduced level.
- Hold: The hold parameter determines the minimum time the gate remains open after the signal falls below the threshold. It prevents the gate from rapidly opening and closing due to fluctuations in the signal level, a phenomenon known as “chattering.”
How do you set up a noise gate?
To set up a noise gate, follow these steps:
- Insert the noise gate plugin: Insert the noise gate plugin on the desired audio track or channel. If you’re using a hardware noise gate, connect it properly to your audio signal chain.
- Set the threshold level: Adjust the threshold so that the gate opens when the desired signal is present and closes when the unwanted noise or bleed is present. Start with a conservative setting and increase the threshold gradually until you achieve the desired balance between the signal and noise reduction.
- Set the reduction: Decide how much you want to turn down the unwanted noise below the threshold. This parameter controls the amount of attenuation applied when the gate is closed.
- Adjust the attack: hold, and release settings. The attack determines how fast the gate opens when the signal exceeds the threshold. The hold setting controls how long the gate remains open after the signal drops below the threshold, and the release setting determines how long it takes for the gate to close after the hold time has elapsed. Adjust these settings to achieve a natural-sounding gate without abrupt or unnatural cuts.
- Fine-tune the settings: Listen to the audio and tweak the threshold, reduction, attack, hold, and release settings as needed to achieve the desired noise reduction while maintaining the integrity of the desired signal.
When should a noise gate be applied?
A noise gate should generally be applied first in your audio chain, but in some cases, it might be placed after noise reduction if needed. It is important not to put it after a compressor. Applying a noise gate during the editing process has several benefits, such as the ability to carefully set it up according to the recorded material and finding the optimal position in the signal chain.
…gates can be applied to isolate a specific sound, like a snare drum, from other sounds in the recording, making it easier to manipulate in the mix.
Noise gates can be used for various purposes, such as removing unwanted background noise from recordings, cutting down amplifier buzz in electric guitars during gaps between notes, and taming breathiness or room reverb in vocal recordings. In mixing, gates can be applied to isolate a specific sound, like a snare drum, from other sounds in the recording, making it easier to manipulate in the mix.
When adding a noise gate to a processed audio track with reverb, make sure to apply it as the first active processor in the chain on the bounced or frozen track. It is essential to determine when you want the noise gate to cut the reverb off and reference the output level at that specific point.
Here are some handy dos and don’ts of gating:
| Do | Don’t |
|---|---|
| Experiment with different attack and release times | Overuse gating, resulting in an unnatural sound |
| Set the threshold to accommodate volume variations | Rely solely on gating to fix poor recordings |
| Use gating as an effect to enhance musical dynamics | Neglect the importance of finding the right gating settings |
| Keep the gating effect subtle and in balance with the mix | Apply excessive gating without considering musical context |
How do you use gating as an effect?
Imagine the sound of a snare drum being hit, and then the sound naturally decaying in volume. Now, picture this: the signal is cut off after the initial hit is heard. This type of effect can be used on various instruments, but the big question is, “Would it benefit the sound?” When used appropriately, gating can add a distinct character and create captivating moments in your music production.
By adjusting the speed at which the gate opens and the signal strength required to open it, you can give the kick drum a punchier sound…
Let’s take a closer look at another fantastic application of gating as an effect: adding punch. Consider the sound of a kick drum being struck. It takes fractions of a second for the volume to build up. By adjusting the speed at which the gate opens and the signal strength required to open it, you can give the kick drum a punchier sound by only opening the gate once the initial sound level is much higher
When using gating as an effect, it’s essential to strike a balance. Too much gating can result in an unnatural and robotic sound, while too little may not deliver the desired impact. Experiment with different attack and release times, as well as threshold settings, to find that sweet spot where the effect enhances the overall musical experience.
If you want even more great tips and information, check out the video below.
Advantages and disadvantages of audio gating
Gating is a powerful tool in music production, offering various advantages and disadvantages that should be considered. Let’s take a closer look at both sides:
Advantages of audio gating
- Noise Reduction: Gating helps eliminate unwanted background noise, improving the clarity and focus of the desired audio sources.
- Enhanced Dynamics: Gating can be used to shape the dynamics of individual instruments or vocals, allowing for more control over the overall mix.
- Creative Sound Design: Gating as an effect opens up possibilities for unique and creative sound design, adding punch and character to various elements.
- Improved Mix Balance: By effectively controlling the audio sources, gating helps achieve a cleaner and more balanced mix.
- Tightened Sound: Gating can tighten the sound of percussive instruments, such as drums or guitars, by controlling the sustain and decay.
Disadvantages of audio gating
- Artificial Sound: Improper gating settings or overuse of gating can lead to an unnatural and artificial sound, affecting the overall musicality.
- Loss of Natural Decay: Overly aggressive gating can result in the abrupt cutoff of natural sound decay, potentially affecting the authenticity of the recordings.
- Chattering and False Triggers: Poorly set gating parameters may cause chattering or false triggering, leading to unwanted audio artifacts or unintended gating of undesired sounds.
- Increased Complexity: Gating requires careful adjustment and monitoring, adding complexity to the mixing process and potentially extending the workflow.
Frequently Asked Questions (FAQ)
Here are answers to some common questions about audio gating:
How can I prevent chattering and false triggering when using gating?
Chattering and false triggering can be minimized by setting appropriate attack, release, and hold times. Additionally, using side-chain techniques and hysteresis can help ignore unwanted signals that might trigger the gate. Experimentation and careful adjustment of the gating parameters are key to achieving clean and accurate results.
Can gating be used in live performances?
Yes, gating can be used in live performances to control unwanted sounds and improve the overall sound quality. It helps reduce stage noise, prevents mic bleed, and enhances the clarity of the intended audio sources. However, it’s important to set the gating parameters carefully to avoid cutting off desired sound elements during dynamic performances.
How do I choose the right range for gating?
Choosing the right range depends on the specific requirements of the audio source and the desired effect. A wider range can completely silence the sound when the gate is closed, while a narrower range allows for a controlled fade and maintains some level of sound even when the gate is closed. Consider the musical context and experiment with different range settings to achieve the desired balance between silence and controlled sound.
Conclusion
And that’s a wrap on our exploration of audio gating! We’ve delved into the world of gating and discovered its significance in music production and audio engineering. From reducing unwanted sounds to adding creative effects, gating offers a range of possibilities to enhance your recordings and mixes.
So, did I cover everything you wanted to know? Let me know in the comments section below. I read and reply to every comment. If you found this article helpful, share it with a friend, and check out my full blog for more tips and tricks on audio production. Thanks for reading, and remember, when it comes to gating, you have the power to control the flow of sound!
Key Takeaways
This article covered the ins and outs of audio gating, focusing on its applications in music production and audio engineering. Here are some key takeaways:
- Audio gating allows you to control when and to what degree audio passes through a channel, providing noise reduction, dynamics shaping, and creative effects.
- Common gating parameters include threshold, attack, release, range, and hold, which can be adjusted to achieve desired results.
- Gating can be advantageous for reducing unwanted sounds, enhancing mix balance, and adding punch and character to recordings.
- However, improper gating settings can lead to artificial sound, loss of natural decay, and chattering issues.
- Understanding the pros and cons of gating and applying it judiciously is crucial for achieving professional and polished audio results.


